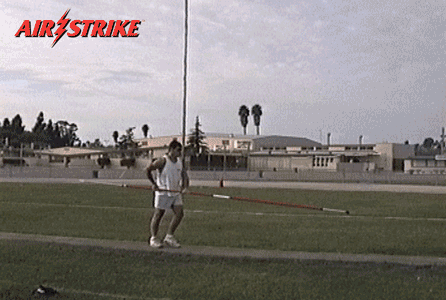
HowToPoleVault.com
Begin by watching these two videos.
CAUTION!!!
-
FIRST, AIR STRIKE "RIGID" POLE VAULT METHODS MUST BE MASTERED! THIS IS CRUCIAL TO LATER PROPERLY PERFORMING AIR STRIKE "FLEXIBLE" POLE VAULTING!
-
AVOID LETHAL "TRADITIONAL" WRONG-WAY POLE VAULT CONCEPTS THAT PRIORITIZE "HEIGHT" OVER "TECHNIQUE"!
-
DO NOT FOCUS ON HEIGHT!!! FOCUS ON PROPER FUNDAMENTAL AIR STRIKE POLE VAULT EXECUTION!!! THEN, MUCH HIGHER VAULTS WILL NATURALLY FOLLOW!
-
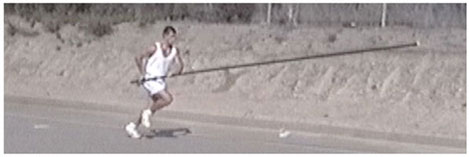
FULL SPEED approach runs are NEVER necessary for properly executed "FLEXIBLE" POLE VAULTING!
NEVER attempt to "BULL-PUSH" ANY FLEXIBLE POLE when vaulting!
-
NEVER ATTEMPT TO FULLY "COCK" ANY FLEXIBLE "COMPETITION" POLE during a vault without FIRST mastering AIR STRIKE "RIGID" pole vault and AIR STRIKE "UNIFORM DIAMETER" flexible pole vault methods.
-
The ability to flawlessly execute "HORIZONTAL FLEXED POLE ROTATION" MUST BE DEVELOPED APPLYING "UNIFORM DIAMETER" FLEXIBLE POLES prior to attempting the same on flexible "COMPETITION" poles!
-
AIR STRIKE FLEXIBLE POLE METHODOLOGY MUST ALWAYS START LOW AND SLOW. The "HORIZONTAL FLEXED POLE ROTATION" process on flexible "COMPETITION" vaulting poles BEGINS WITH GROUND "STRIKES" ONLY. NEVER commence applying flexible "COMPETITION" poles by immediately attempting to "STRIKE" while in the "AIR."
-
Vaulting on ANY MINIMUM LENGTH FLEXIBLE "COMPETITION" POLE relative to the athlete's BODYWEIGHT & EXTENSION VERTEX, if the vaulter's clearance APEX is NOT EXCEEDING at LEAST 4 FEET (1.2192M) consistently above the "GRIP" position, the vaulter is NOT yet QUALIFIED to attempt applying a longer flexible "competition" pole.
-
IF YOU ARE TOO IMPATIENT TO CAREFULLY FOLLOW OUR LIFE-SAVING INSTRUCTIONS, PLEASE, LEAVE NOW FOR SAFETY'S SAKE!
CAUTION: You need to be aware that, other than ourselves at TOLEDO AIR STRIKE, no person or institution has been authorized or is qualified to teach TOLEDO AIR STRIKE POLE VAULT methods, including Air Strike Horizontal Flexed Pole Rotation (shown below). Since TOLEDO AIR STRIKE techniques must be meticulously taught applying proper tools with exceptional caution, no public university, college, high school, private organization, nor any other entity, is approved to do so without our explicit written permission.
TOLEDO AIR STRIKE STEP-BY-STEP POLE VAULT EDUCATION BEGINS HERE

"AIR STRIKE" POLE VAULT REQUIRES THAT THREE ELEMENTARY FUNDAMENTALS BE CONSTANTLY REHEARSED FOREVER. These THREE lifetime fundamentals can be practiced perfectly from the very beginning and throughout the entire "AIR STRIKE" POLE VAULT EXPERIENCE without any need for costly landing mats, pole vault standards, expensive crossbars or any other over-priced athletic equipment. VALUE and RESPECT these 3 principles!
-
STRIDE ACCURACY DURING THE APPROACH RUN
-
CARRYING THE POLE & LOWERING THE TIP
-
GUIDING THE POLE TIP INTO THE SLIDEWAY
Mastering these crucial AIR STRIKE fundamentals can easily be accomplished by applying the following instructions as perfectly as possible. Adaptations are included in this documentation that are additional to the 1992 original.
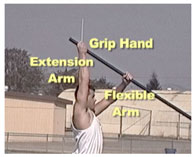
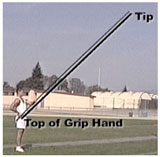
These instructions presume the athlete is RIGHT-HANDED. Familiarize yourself with the following terms, they will be used throughout this documentation. For a right-handed vaulter, "extension" arm is the right arm, "flexible" arm is the left. "Grip" hand is the right hand, nearest the top of the pole. "Grip height" is the distance between tip of the pole and the top of the grip hand. After completing the following video, proceed to the "FUNDAMENTALS 002" video.
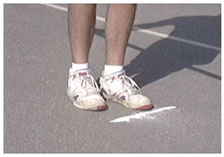
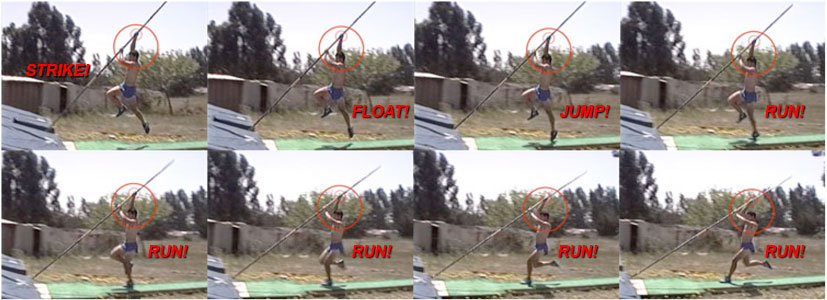
We begin with the first training element of the "Air Strike" program, the "RUN" drill. This procedure is comprised of seven separate segments titled individually as: "standing-walk-through" / "walk-through" / "full-length-pole-walk-through" / "check marking the run" / "placing the tip" / "jump" / "float." The RUN DRILL sequence culminates the moment the pole-tip "strikes" the back wall of the "plant box."
THE RUN DRILL
The first training segment of the RUN DRILL is the "standing-walk-through." Properly "walking through the run" is the most essential fundamental that leads to the performance of a correct vault. Keep in mind that to successfully apply knowledge, you must properly exercise knowledge. The "standing-walk-through" and "walk-through" exercises can even be accomplished in your living room. These procedures make learning the most significant components of the pole vault, the simplest to practice, making them the easiest to precisely develop and maintain.
To begin the "standing-walk-through," we recommend that you use a broomstick or anything similar and envision that this stick is a full-length pole.
The purpose of this exercise is to visualize properly placing the tip of a full-length pole on the ground in front of you towards a center point or slideway. It will also discipline movement, placement and timing of the "extension" arm and "flexible" arm while lowering the tip and correctly lifting the top of the pole for proper tip placement. After completing the following video, proceed to the "FUNDAMENTALS 003" video.
"STANDING-WALK-THROUGH"
Step 1: HOW to hold the pole. Grip hand is palm-up, other hand palm-down, with your thumbs wrapped around the pole. Apply relaxed hand-holds.
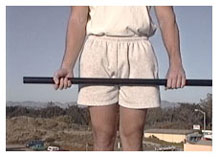
Step 2: For the hand spread, place your hands approximately shoulder-width apart.
Step 3: Stand facing with feet and body straight at your center point, placing grip hand on the side of your hip at waist height.
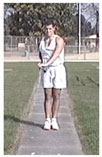
Step 4: While keeping grip hand on your hip, use flexible arm to aim the imaginary tip at your center point. From here on, always try to keep your body as square as possible to your center point.

Step 5: Aiming the tip at your center point, while keeping grip hand on hip, raise and lower the tip using the flexible arm to follow an up and down line from eye-level to waist-level on your center point. This exercises moving the pole tip up and down on center.
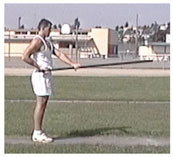
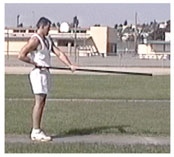
Step 6: Lower the imaginary tip from eye-level to just below waist-level preparing to place the tip centered on the ground. Keep in mind that a full-length pole tip would now be close to the ground on center. Use your flexible arm to guide the tip so that it will continue downward on the center line as you move the pole with your grip hand slightly forward and up.
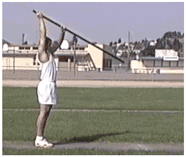
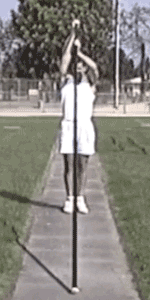
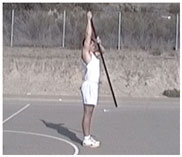
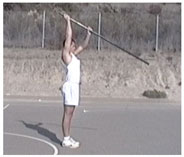
Keeping the grip hand aligned with the side of the body, continue the lifting motion with the grip hand until it is centered over the head on full extension and the imaginary tip will be resting on the ground at center point. Successful extension is when, from back or front view, the grip and pole are centered overhead and fully extended upward.

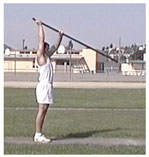
From the side view the extension arm will be perpendicular, vertical. Focus only on a straight extension arm. Never extend or push upward with the flexible arm. Use a mirror, video, or someone else's assistance to monitor that you are extending properly. After completing the following video, proceed to the "FUNDAMENTALS 004" video.
Do not proceed without mastering a clear understanding of proper VERTICAL EXTENSION as described in the "Standing-Walk-Through," it is the key to "Air Strike" and MUST be done properly.
"WALK-THROUGH" & "FULL-LENGTH-POLE-WALK-THROUGH" VIDEO
"WALK-THROUGH"
Now we'll describe the "walk-through." After repeating steps 1 through 5 of the "standing-walk-through," lower the imaginary tip from eye-level to just below waist-level, preparing to place the centered tip on the ground. From a standing position, simultaneously step forward with your left foot as you move the grip hand slightly forward and upward.
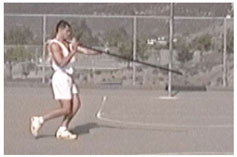
Stated differently, at the moment you start your hand off of the hip, begin the first of three walking steps. As you continue this upward motion of the grip, take the second step, settle, in other words, lower your center of gravity by bending the leg as if preparing to jump off the next step, which is the "final step." Continue the upward movement, completing it with a simultaneous extension and slight jump. Focus on a perpendicular extension arm. Never extend or push upward with the flexible arm. Use a mirror, video, or someone else's assistance to monitor that you are extending properly.
"FULL-LENGTH-POLE-WALK-THROUGH"
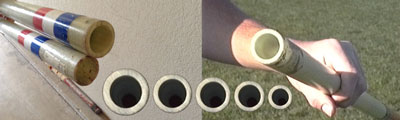
NOTE: If you do not have access to vaulting poles, PVC pipe can be used for simulation. 1¼" pipe inserted with ¾" pipe produces similar rigidity and a good weight for developing strength. Twenty-foot lengths, that can be customized, are available at most hardware and plumbing suppliers. Remember to place a "cap" on the bottom end of the exterior tube. NEVER use PVC couplings on joints. Grip the pole far enough towards the top to create no more than a 45 degree angle with the tip resting centered on the ground in front of you at full extension. Now proceed to repeat both the "standing-walk-through" and "walk-through" exercises applying a full-length pole (or facsimile) to become accustomed to handling a full-length vaulting pole before attempting to run with the pole.
Find an area where there's enough space to run and work with a full-length pole. Sixty to eighty feet will be enough distance for running. Paved surfaces, such as tennis courts, basketball courts, parking lots, will work great, using chalk for marking steps. Dirt surfaces will work well, too. If you have access to a track or gym, that's fine. After completing the following video, proceed to the "FUNDAMENTALS 005" video.
"CHECK MARKING THE RUN" VIDEO
"CHECK MARKING THE RUN"
The purpose of "check marking" is to gauge and develop consistency of your running velocity and stride length. Mark a line on the ground and place your left foot behind it. Holding the pole with the grip hand on your hip, and with the tip centered in front of you at approximately eye-level, and kept there, proceed to run slowly, starting with the right foot, gradually increasing speed for eight steps. Don't swing your arms as you run, try to keep your grip against your hip.
WARNING! WARNING! WARNING!
Maximum controlled horizontal velocity will be accomplished later by adding steps. For now, simply repeat the above process at least a dozen times. Each time mark where your fourth step (second left) lands. Mark the average landing point of this step. Note again: NEVER apply your top running speed.
You will now have a starting line and a fourth step check mark. In time, you will develop a longer approach run. Regardless of the length of your approach run, you will always begin by using this method. The fourth step check mark is the only check mark that you will always look down to see as you go by. Any following check marks require a spotter.

Understanding that strides tend to vary, you must develop a comfortable pattern of disciplined distances between check marks. This is because you must be as accurate as possible when you reach your "jumping point" at the end of the approach run. Practice running through your fourth step check mark by taking at least eight steps and consistently hitting your mark. Be sure to recheck your steps before each practice. Make minor adjustments when necessary. After completing the following video, proceed to the "FUNDAMENTALS 006" & "FUNDAMENTALS 007" videos.
"PLACING THE TIP" & "JUMP" VIDEO
"PLACING THE TIP"
The pole tip should be at or below waist-level and steadily lowering to the ground during at least your last six strides to achieve a soft, smooth placement. Lowering the tip early creates a comfortable rhythmic lifting of the grip at extension.
Practice this before going on, using at least eight strides. It is essential that you become comfortable and consistent with the feeling of this movement continued to "extension" on the final step.
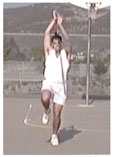
"JUMP"
Hold high enough towards the top of the pole during this exercise so that the pole tip will slide ahead of you smoothly on the ground when you jump. If your grip is too low, it will prevent the pole from sliding at the jump. Repeat the preceding exercise using eight strides and simply jump off of the eighth step. While preparing to jump, you are placing the tip and raising the top as you already practiced in the walk-throughs. Practice not over-striding between the settle and the jump step. In other words, do not stretch into the last step.
Repeat this exercise at least a dozen times, marking each point you jump from. Mark a line at the average jump point. Practice with a spotter to achieve consistency. After completing the following videos, proceed to the "FUNDAMENTALS 008" video.
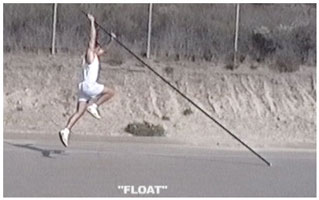
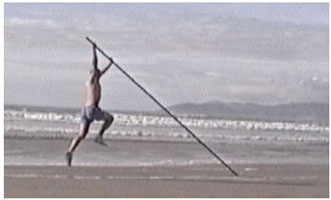
"FLOAT" VIDEOS
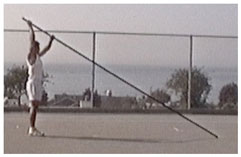
"FLOAT"
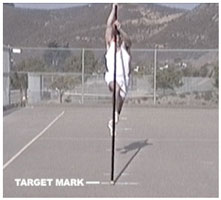
The final element of the "RUN," is the "FLOAT." To practice the float, simply make the following addition to the previous jump exercise. Stand at your average jump mark with your jump foot. Place feet together, flat-footed, using the same grip height with the pole fully extended overhead and mark where the pole tip is resting centered on the ground in front of you. Now mark a spot approximately three feet in line beyond that point. This mark will be the target mark which will be used to slide the tip directly towards after you have jumped off the ground.
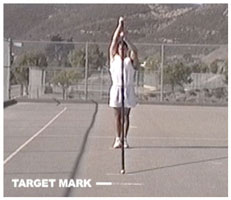
The goal is to float with proper body position at the same time becoming aware of sliding the tip centered on the ground while your body is rising to lift the top of the pole. Focus on driving the pole tip through the target mark as you fly upward, holding proper form. The target mark represents the back of the slideway, the strike point in an actual vault. This exercise must be practiced as often as possible, and remember to keep your flexible arm relaxed while holding proper "extension" form.

The float is absolutely critical to the successful application of Air Strike. The instant you jump off of the ground, the float begins. During the walk-through you practiced proper extension exercises which have tuned your skills to assist you with properly executing the float. Proper float execution is the ability to leap and hold your body position with its center of gravity directly below your grip hand as the body rises farther from the ground during the upward part of the arc created by the jump.
The RUN DRILL exercises give you the opportunity to experience full movement and simulate this portion of the vaulting process. What is unique about these drills is that they can be done just about anywhere, and this is truly to your advantage because the more you practice them, the better you are going to become. The "FLOAT" is the final movement of the RUN DRILL. When you have mastered an understanding and discipline of the preceding exercises, you are ready for "Air Strike."
Caution: Always monitor your exercises to be certain that you never extend or push upward with the flexible arm. If you extend or push upward with the flexible arm, the pole tip will not be on the ground when the extension arm is in proper position. The result is that the extension arm, or both extension arm and body, will be forced to lean forward when placing the tip, making it impossible to have proper form. Remember, proper placement of the "extension" arm is essential for "Air Strike" success.
It is imperative that AIR STRIKE fundamentals be repeatedly practiced perfectly.
"BROOMSTICK"
You have been using a grip height in the full-length pole drills that allowed the pole to slide easily on the ground. Now, you must lower your grip to begin performing the Air Strike drills. This will create a softer impact at strike because it will put the pole at a higher angle from the ground making it easier to raise after the strike but it also makes it more difficult to keep your "grip" directly above your head.
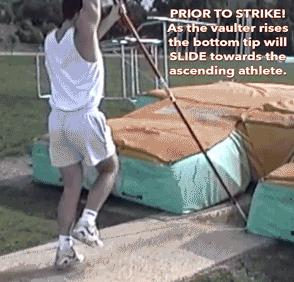
As you "JUMP" during these exercises the pole's bottom tip will SLIDE towards you as you RISE. BEWARE, this physics reality, defined by the Pythagorean Theorem, will challenge your proper Air Strike execution. Be SURE to work on allowing the pole's bottom tip to remain in contact with the "slideway" ramp as you attempt to maintain proper "VERTICAL EXTENSION."
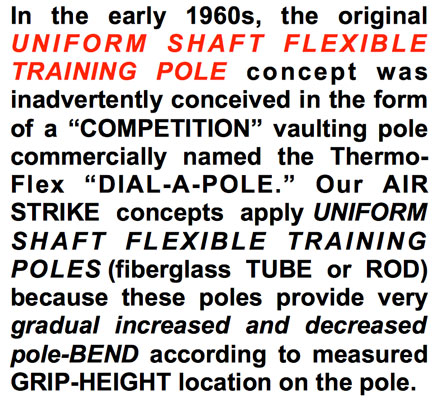
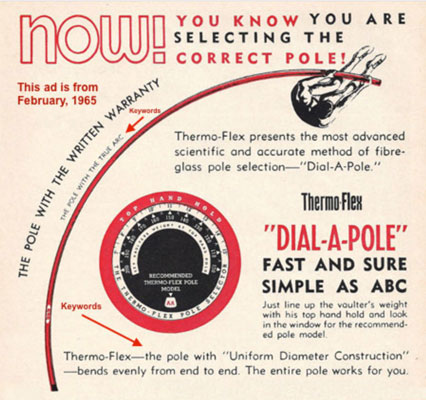
CRITICAL NOTE: ANY mention of "TRAINING" poles in our videos refers ONLY TO "UNIFORM DIAMETER" flexible vaulting poles, such as, the "MAXIMA" poles pictured below that we applied during our recordings.
In NO WAY, whatsoever, are we ever referring to common standard "TRAINING POLES" of wrong-way "traditional" philosophies when we apply the term "TRAINING POLE" in our video exercises or text descriptions.
FUNDAMENTALS MUST ALWAYS BE PRACTICED AS PERFECTLY AS POSSIBLE. CONSTANTLY RECORD IMAGES OF EXECUTION AND REVIEW FOR ACCURACY!
Before proceeding further, there is another "broomstick" exercise that needs to be introduced here. It is important that you comprehend, when you begin actually striking the back of the slideway applying a flexible "uniform diameter" pole progression (or any other) your "grip" will be low, resulting in the pole being abnormally close to your face after "strike." With the unbent pole close to your face it becomes far more difficult to position your "grip" properly than during the full application of "horizontal flexed pole rotation" where flexible poles "bow" smoothly to the side of the vaulter's "glide" path.
For this exercise, stand with your "grip" overhead and bring the "broomstick" implement in against your chest, between the side of your face and "extension" arm, as though you are "hanging" from a vertical pole. While remaining as near as possible to being directly beneath the hand from which you imagine yourself suspended, raise and lower the implement repeatedly with the "flexible" arm.
Additionally, this exercise helps you get accustomed to holding proper "EXTENSION" throughout the unique AIR STRIKE "RIGID" pole vaulting process.
"AIR STRIKE" DRILLS
The drill described in the video above can be done without landing mats by reducing the approach to FOUR STEPS. It is imperative that you learn from the beginning to be in the air, never on the ground, at strike. EVEN WHEN YOU DON'T HAVE ACCESS to EXPENSIVE vaulting equipment you CAN expedite the proper learning process by applying very elementary AIR STRIKE BASIC TRAINING techniques that produce EXTREME benefits when executed CONSCIENTIOUSLY and continuously REPEATED correctly.
IMPORTANT: ALWAYS apply either a plant box or facsimile when performing any drills that incorporate a run, jump, float and ACTUAL STRIKE. Certainly, not everyone has access to expensive landing mats, vaulting poles, runway, plant box or standards. To simulate the slideway, you can simply excavate a ramp in the ground that is as near as possible to "official" plant box specifications. To simulate a pole, you can apply any type of rod, bamboo, etceteras, that is long enough to serve the purpose and strong enough to safely support your bodyweight.
As an example of a "rigid" pole exercise, you can go to any stationary VERTICAL pole, that is narrow enough to grasp, and practice repeatedly hanging suspended from your "grip hand" to quickly develop strength far exceeding the minimal "grip" force required to successfully implement "horizontal flexed pole rotation" principles applying a flexible vaulting pole. The most obvious ADVANTAGE of this exercise is that it's much more difficult to grasp and hang from a perpendicular "rigid" pole than from a horizontally "loading" flexible pole that is bowing smoothly to the side of your forward path where your hands maneuver into the actual horizontal bar "pull-over" position. There are many more benefits to this "seemingly" elementary exercise than just increasing grip strength.
In addition to enhancing grip force, HANGING correctly from a tetherball pole, a dance pole, or any other similar implement that can be practically applied, additionally avails the ability to legitimately replicate actual "RIGID" pole vault execution processes. These include the actions of leaning the upper body into the pole against your chest between the side of your face and "extension" arm, then proceeding to bring the "flexible" arm's elbow from the outside of the rigid pole to be positioned between the pole and the side of your body.
When performing AIR STRIKE drills that incorporate a short run, the jump, float and strike, the highest impact angle the moment of "strike" creates a cushion for any mistakes that occur in beginning this learning process. Do NOT hold too low. Holding too low will cause you to out-jump your grip height. For example, if on your tip-toes you can reach a grip height of eight feet, you must further raise your grip to allow for the jump, float and decline of the slideway. Since the slideway slopes to an eight inch depth below the runway level, this means that when the pole is extended vertically from the bottom of the slideway, it is now eight inches lower than it was at ground-level. Thus, this example produces a minimum of 8' 8'' to which several more inches MUST be added because you should be completely off the ground at "strike" during these drills.
Becoming accustomed to HANGING from a moving pole while applying the beginning "grip" position can be easily accomplished by stacking blocks comprised of solid material that is safe to stand on and stable enough to step from as a "take-off" platform. To simulate the plant box, simply cut a declining ramp 8'' deep slot into the ground in which to "plant" the bottom tip of the practice pole.
If you think taking a few steps and JUMPING with a RIGID pole as you guide its bottom tip forward to STRIKE the back wall of an 8" (0.2032M) declining slideway while repeatedly holding PROPER FORM is easy, just TRY IT. Then, be sure to study images of YOUR performance and closely observe the DETAILS for accuracy.
If you don't have access to a "plant box" you can create a facsimile by sculpting your own in the ground. There is no need to worry about the angles of the sides or distance between the sides, focus only on the angle of the ramp and back wall of your plant box facsimile. ANYTIME "AIR STRIKE" is performed you MUST use a plant box, or something very similar, in order to employ the dynamic affects that occur during the decline of the pole's bottom tip as it slides sloping downward to suddenly stop eight inches below ground level. Do your best to emulate the movements depicted in the images above repeatedly and as accurately as possible.
WE'VE CREATED PROTOTYPES TO FULLY SIMULATE CRUCIAL MOVEMENTS WITHOUT ACTUALLY VAULTING!
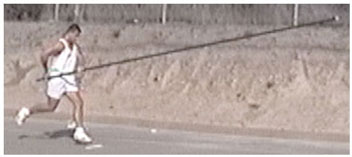
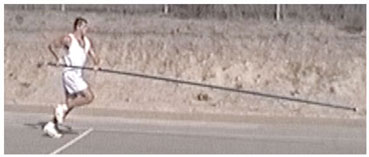
In 2011, when my interest in pole vault was rekindled after more than 15 years of completely ignoring the event, I discovered that, in the 1990s, the "powers that be" had banned the application of uniform diameter flexible poles. Flexible uniform diameter poles are absolutely paramount for teaching safer, easier and efficient pole vault methods. Since these superior implements had been banned due to corruption within the event's regulatory organizations, we, at Air Strike, were forced to seek additional alternative learning methods. Thus, we successfully created simulators that allow athletes to safely emulate the kinetics of Horizontal Flexed Pole Rotation along with INVERSION, LAUNCH & FLY AWAY actions. An example is shown here:
Air Strike students can now safely MASTER crucial Horizontal Flexed Pole Rotation together with Air Strike's superior INVERSION, LAUNCH & FLY AWAY movements without any prior experience with actual vaulting poles. FOR FURTHER TRAINING INFORMATION CONTACT US.
CAUTION: You need to be aware that, other than ourselves at Air Strike, no person or institution has been authorized or is qualified to teach AIR STRIKE POLE VAULT methods, including Air Strike Horizontal Flexed Pole Rotation. Since Air Strike techniques must be meticulously taught applying proper tools with exceptional caution, no public university, college, high school, private organization, nor any other entity, is approved to do so without our explicit written permission.
WARNING: ANYONE TEACHING THAT FLEXIBLE "COMPETITION" POLES BE USED BEFORE FIRST MASTERING VAULTING SKILLS APPLYING UNIFORM DIAMETER FLEXIBLE POLES IS GROSSLY NEGLIGENT.
Prior to EVER attempting to perform FULL "flexible" pole vaults applying "COMPETITION" vaulting poles, AIR STRIKE "RIGID" AND "UNIFORM DIAMETER" POLE VAULT TECHNIQUES MUST BE SAFELY MASTERED FIRST!
A "FULL" AIR STRIKE vault is optimally achieved by having access to a runway, plant box and landing mats. We require using UNIFORM DIAMETER FLEXIBLE poles because these poles are extremely strong and pliable due to their simple construction. One TREMENDOUS advantage is that several "uniform shaft" poles, differing from each other in "manufacturer specifications," can be variably applied to the same vaulter based on simple leverage physics. Quality flexible "uniform diameter" poles also avail HUGE SAFETY benefits for athletes with the desire to learn how to pole vault correctly.
It needs to be reiterated that learning "horizontal flexed pole rotation" movement using a very low grip on any pole of "uniform diameter construction" (as in our flexible "MAXIMA" poles) is a MUST. Although, it is a reality that there are athletes, such as many decathletes, capable of "short-cutting" proper training procedures, it is NOT wise to skip safely mastering basic Air Strike principles. The "uniform diameter construction" of quality designed flexible poles is the SAFEST and SIMPLEST MEANS to properly grasp "HORIZONTAL FLEXED POLE ROTATION" concepts after BEGINNING by carefully walking through the movements.
One of the most glaring LETHAL problems with today's flexible "competition" vaulting poles is that manufacturers KNOW the powerful flexible poles THEY produce ABSOLUTELY MUST be "gripped" at the very TOP END to achieve the manufacturers' "built-in" physics specifications which are PREDICATED almost entirely on the anticipated bodyweight of the user. It is basic common sense that the "grip" must be placed at the farthest end of flexible "competition" vaulting poles. This is because the "fishing rod" style and "NON-uniform construction" of flexible "competition" poles dictates maximum "grip" position as the only location optimum leverage is achieved. THAT IS WHY ...
STEP-BY-STEP "HORIZONTAL FLEXED POLE ROTATION" CAN NOT BE TAUGHT SAFELY BY BEGINNING ON FLEXIBLE "COMPETITION" POLES!
Therefore, it is the "AIR STRIKE" pole vault philosophy that, if only for the sake of the athlete's SAFETY, the student vaulter MUST MASTER A SPECIFIC LEVEL OF "AIR STRIKE" POLE VAULT TECHNIQUE ON FLEXIBLE "UNIFORM DIAMETER" POLES prior to ever attempting "FULL VAULTS" on today's HIGH-RISK flexible "COMPETITION" poles.
Keep in mind, today's "competition" pole manufacturer specifications dictate, according to their own "built-in" laws of physics, that these vaulting poles HAVE ONLY ONE EFFICIENT "GRIP" POSITION. To the contrary, flexible "UNIFORM DIAMETER" poles are designed to accommodate a VAST ARRAY of applications and improvisations contributing to PROFICIENT innovative "AIR STRIKE" methods that make pole vault safer and easier to learn because they provide "universal" grip positions.
FLEXIBLE VAULTING POLE LEVERAGE PRINCIPLES
When the TOP END OF ANY flexible 16 foot long (4.877m) pole is bent following a vertical line down to a distance of 10' 5" (3.170m) from its opposite end, the pole is BENT END-OVER-END at 65% of its TOTAL STRAIGHT LENGTH. This is termed a "65% CHORD" by vaulting pole manufacturers. This unifrom principle applies to ALL FLEXIBLE VAULTING POLES.
Since pole-bend percentages relate to both types of "flexible" poles, "competition" and "uniform diameter," this principle is used in "AIR STRIKE" to provide SAFER STANDARDS of application. Proper application of flexible "competition" poles is very LIMITED in comparison to uniform diameter flexible poles. "Grip-heights" CAN be properly located ANYWHERE up or down a BENT UNIFORM DIAMETER POLE to produce proper "PULL-OVER" POSITION (aka "COCKED" END-OVER-END manufacturer specified flexed pole position). The AIR STRIKE difference between the "competition" and "uniform diameter" flexible pole "CHORD" application is that we apply the term to "uniform diameter" flexible poles according to WHEREVER the top of the "GRIP-HAND" is located RELATIVE to the bottom tip of the pole.
"AIR STRIKE" identifies the significance of "correctly" applying pole-bend percentages of flexible "COMPETITION" poles because EACH has ONLY ONE OPTIMUM SAFE-BEND GRIP POSITION. Contrary to UNI-GRIP flexible "COMPETITION" vaulting poles, ALL "UNIFORM DIAMETER" flexible poles BEND as a UNIFORM "ARC" WHATEVER portion of the pole is between the GRIP-HAND location and the bottom tip. Thus, ANY GRIP POSITION WILL FLEX EVERY "UNIFORM DIAMETER" POLE ACCORDING TO ITS MANUFACTURER SPECIFICATIONS.
A 16 foot UNIFORM DIAMETER pole, because it flexes uniformly regardless of GRIP position, produces abundant applications. For example, a 12' (3.658m) GRIP HEIGHT on a 16' uniform diameter pole simulates a 12' GRIP on a flexible "competition" pole when the "controlled horizontal velocity" and "bodyweight" of the suspended vaulter produce a maximum "bend" in which the top of the "grip" hand is VERTICALLY aligned roughly 7' 10" (2.378m) directly perpendicular above the pole's bottom tip. At this point, a 65% CHORD "competition" pole-bend is being closely simulated as indicated in the 12' 0" (3.658m) pole length row of the chart below. Keep in mind that "uniform diameter" poles will always form a smooth "arc" UNLIKE the inverted capital "J" analogy pertaining to PROPERLY FLEXED "competition" poles.

At the perpendicular distance of 8' 5'' (2.561m) between the top of the "grip" and the bottom tip of the BENT "uniform diameter" pole, a 70% pole bend has been created simulating the "cocked" position of a 12' flexible "competition" pole designed and manufactured to those specifications. This uniform diversity of flexible "uniform diameter" pole-bend allows the athlete to maneuver into proper "suspended" positions in which vertical control of recoiling vaulting poles can be practiced gradually and far safer. These learning methods unquestionably allow complex flexible "competition" pole movements to be perfected on very "SOFT" but very strong flexible "uniform diameter" training poles while vaulters are safely above the landing area and much closer to the mats beneath them.
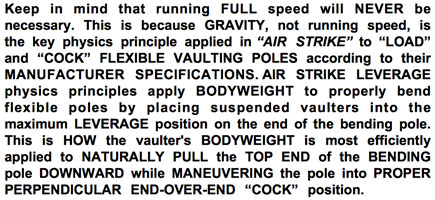
The desired outcome of these AIR STRIKE flexible "uniform diameter" pole drills is that the athlete masters how to GLIDE FORWARD while HANGING properly suspended from the increasingly bending pole for the purpose of experiencing the benefits of "horizontal flexed pole rotation" principles. With the AIR STRIKE method it is the LEVERAGE produced by PROPER application of suspended bodyweight that NATURALLY BENDS the pole, NOT RUNNING SPEED.
Doing these exercises, the vaulter's FOCUS must be concentrated on GLIDING FORWARD while properly hanging from the "GRIP" hand in order to utilize the forces of GRAVITY that increasingly bend the pole. It is very important to be cognizant that the SIGNIFICANCE of quality flexible "uniform diameter" poles is that they BOW in a true arc because of their simple construction. The farther the athlete's suspended WEIGHT is moved towards the upper end of the flexing pole, the MORE the pole will BEND uniformly.
Also, keep in mind, even though increases in LEVERAGE remain incremental as grip-heights are raised on UNIFORM DIAMETER flexible poles, relative pole-bend becomes EXPONENTIALLY EASIER and that gradually increasing grip-heights on the vaulting pole also incrementally increase the JUMP MARK distance from the back wall of the plant box.
NEVER advance to vaulting with flexible "COMPETITION" poles UNTIL you have mastered the ability to properly "LOAD" and "COCK" flexible "UNIFORM DIAMETER" poles. When you can safely, consistently and successfully apply the approach run, jump, float, strike, horizontal flexed pole rotation to correctly "cock" the "uniform diameter" pole and complete the body inversion process entirely above the landing mats, you have efficiently maximized the application of the uniform diameter flexible "TRAINING" pole. BUT, always keep in mind that, for your own benefit, you MUST continually DO these basic AIR STRIKE "UNIFORM DIAMETER" POLE DRILLS throughout your pole vaulting experience.
Further information on AIR STRIKE flexible "competition" pole vaulting will continue being provided as a FREE PUBLIC SERVICE after I have set up a means of validating that our instructions are being followed meticulously by users. In the meantime, I appreciate any assistance you can provide with getting "uniform diameter" flexible training poles made available again. I am trying to locate a manufacturer for the production of uniform diameter flexible poles outside the United States as American entities continue "turning a deaf ear" to my requests and safety concerns.
It is critical to remain mindful that learning to apply AIR STRIKE pole vault techniques CORRECTLY is paramount to the athlete's safety. The AIR STRIKE flexible pole vault objective is to bend properly manipulated flexible poles according to their manufacturers' specifications for the purpose of achieving consistently accurate pole vault performances safely above the landing mats. Prior to EVER attempting to perform "flexible" pole vault using a flexible "COMPETITION" vaulting pole, AIR STRIKE "RIGID" AND "UNIFORM DIAMETER" POLE VAULT TECHNIQUES MUST BE MASTERED FIRST!
THOROUGH PREPARATION is the primary significant difference between METICULOUS "AIR STRIKE" GROUNDWORK detail and lackadaisical lethal "TRADITIONAL" pole vault teachings that encourage athletes to attempt deadly pole vault without proper qualification. The bottom line is that YOU are responsible for YOURSELF in recognizing the REAL DEADLY CONSEQUENCES OF RUSHING into attempting a dangerous activity without proper and thorough preparation.
AIR STRIKE PROVIDES IMMENSE GRATIFICATION TO ANY ATHLETE WANTING TO POLE VAULT SAFER AND HIGHER!

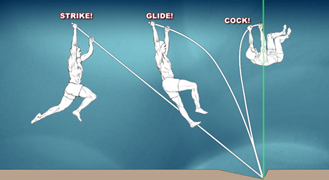
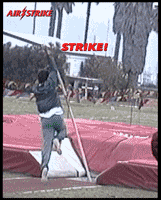
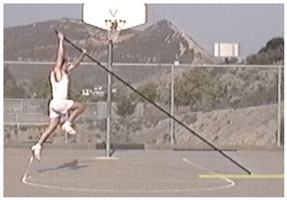
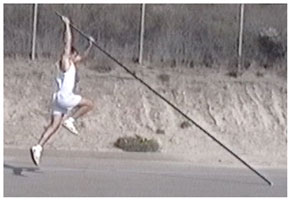
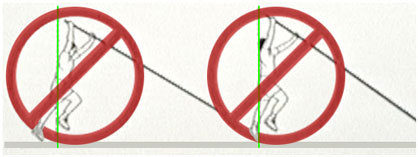
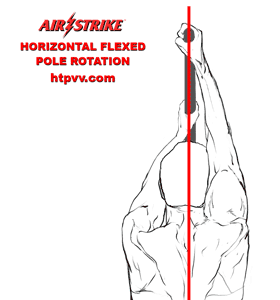
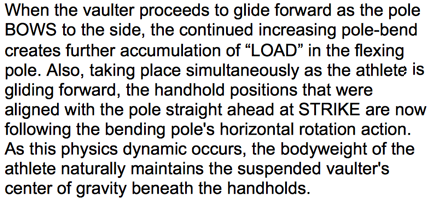
During the split-seconds of AIR STRIKE HORIZONTAL FLEXED POLE ROTATION, the vaulter's suspended body moves forward while hanging at the top end of the pole as it BOWS away from the vaulter's forward path. Demonstrated below, PRIOR to "STRIKE," viewed from back or front, the vaulter's hands align on-center with the straight pole from bottom tip to top tip in front of the vaulter. POST "STRIKE," when the suspended vaulter glides forward, both hands will automatically rotate away from front-center alignment during the flexing pole's horizontal rotation.
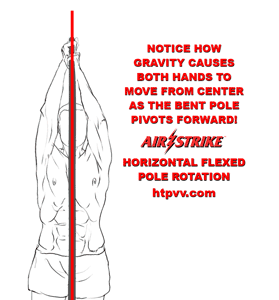
GRAVITY naturally pulls the top of the bending pole downward, assisting the "loading" process, as the vaulter's body drives forward moving into proper "PULL-OVER" position. The moment the bending pole is "COCKED" end-over-end vertically, MAXIMUM POLE BEND has been safely achieved as the vaulter instantly inverts skyward above the surface of the landing mats.
The two videos below demonstrate elementary DRILLS specific to the actions described above. You will find that manipulating various lengths and diameters of "flexible vaulting pole simulators" constructed of reinforced PVC pipe produce accurate replications of actual flexible pole vault physics described in the above dynamics. These easy exercises will cause you to immediately realize some of the differences between WRONG-WAY "traditional" DISADVANTAGES of "BULL-PUSHING" flexible vaulting poles and the huge ADVANTAGES of applying "HORIZONTAL FLEXED POLE ROTATION" principles when flexible pole vaulting. The first video is only 1:08 in length. The second video is 4:22 in length, with a simple "high-bar" test that begins at 3:15 (but it won't do any harm if you watch the entire video).
If you attempt to turn (twist) your suspended body, hanging from a "high bar" as you see being done in the video above, you will immediately become fully aware of the direction in which GRAVITY intends your suspended body to face. Gravity forces your body to hang facing perpendicular to the bar, in "pull-over" position, which naturally opposes being aligned with the bar. This exercise safely replicates the cause of the lethal consequences that result from attempting to "BULL-PUSH" flexible vaulting poles forward. The deadly fact is that a dynamic flexing vaulting pole is NOT a "fixed-in-place" bar overhead and, with absolute certainty, the powerful pole's reaction to being abused is ALWAYS DETRIMENTAL to any vaulter.

INTELLIGENT athletes begin FLEXIBLE POLE VAULT training on UNIFORM SHAFT FLEXIBLE TRAINING POLES applying AIR STRIKE RIGID pole methods and GRADUALLY TRANSITION to AIR STRIKE FLEXIBLE pole methods by SAFELY raising grip-height location measuredly to increase pole-bend incrementally. One of the most critical aspects to comprehend during the gradual RIGID pole to FLEXIBLE pole "transition" process is that FLEXIBLE vaulting poles are STRAIGHT when they STRIKE! Thus, ALL of the training processes leading to the moment of STRIKE using a RIGID pole are applicable to FLEXIBLE poles.
Proper positioning of the lower arm's elbow during AIR STRIKE RIGID POLE VAULT EXECUTION MUST BE MASTERED FIRST! Rigid POLE-CONTROL reinforces the athlete's self-confidence as vaulting skills advance naturally. Once AIR STRIKE RIGID pole methods are mastered, measured increased BENDING of uniform flexible shaft poles will produce controlled gradual transitions throughout the HORIZONTAL FLEXED POLE ROTATION process. As any uniform shaft flexible training pole BENDS increasingly (while the bending pole is allowed to properly rotate) the desired BEND will inevitably naturally begin to take place. When the vaulter's body is hanging perfectly suspended from the rotating flexed pole, the vaulter's lower elbow will automatically fall into proper pull-over position beneath the flexing shaft overhead. Since this stage has been correctly achieved step-by-step, the athlete is now inherently familiar with being correctly suspended from a flexed vaulting pole.

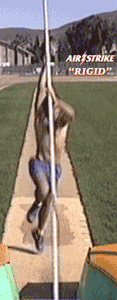
AIR STRIKE "RIGID" POLE VAULT
The EASIEST, SAFEST and QUICKEST path to learning how to pole vault correctly is the application of AIR STRIKE RIGID POLE VAULT methods. The athlete MUST master correct RIGID (stiff) pole execution FIRST, to be followed with UNIFORM DIAMETER flexible pole training and, ultimately, FLEXIBLE COMPETITION pole training. It is imperative that athletes are thoroughly capable and qualified in the execution of absolute RIGID POLE-CONTROL before attempting full vaults that incorporate FLEXIBLE poles.
$10,000 REWARD
Metal pole vaulters, Bob Richards ("Wheaties" spokesman) and Don Bragg (metal pole world record holder), made a clearly over confident "open-offer" of a $10,000 REWARD to anyone who can vault higher than 15' 9 1/4" using a METAL vaulting pole. This turns out to be a harebrained provocation since our AIR STRIKE RIGID pole vault techniques make it possible for HUNDREDS of athletes to easily WIN the $10,000 challenge within just a few weeks of proper AIR STRIKE training! ANYONE who can JUMP high enough to slam a basketball into a 10-foot "hoop" is capable of pole vaulting over 16 feet using a RIGID pole. That includes any sturdy applicable BAMBOO pole or any 1950s metal COMPETITION vaulting pole!
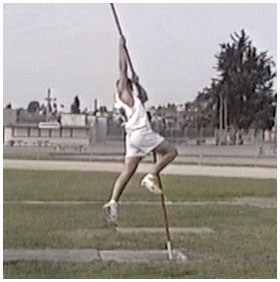
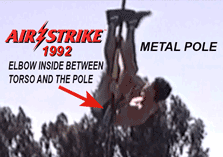
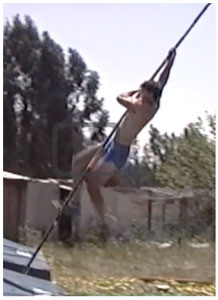
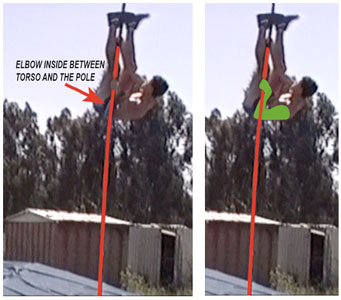
"TRADITIONAL" ill-informed RIGID pole vaulters have always been unwisely coached to foolishly place the lower arm's elbow OUTSIDE the pole as the vaulter raises the legs which, in turn, DESTROYS VERTICAL body inversion. Two of the simplest AIR STRIKE RIGID pole vault solutions are, first of all, JUMP in concert with the momentum of the upward moving rigid pole as if the pole is a basketball to be "dunked" with the upper hand. Secondly, in order to create VERTICAL body inversion, bring the FLEXIBLE arm's elbow to the INSIDE between the athlete's torso and the pole as Chris Toledo is doing (twenty-five years ago) executing proper AIR STRIKE "RIGID" pole vault.
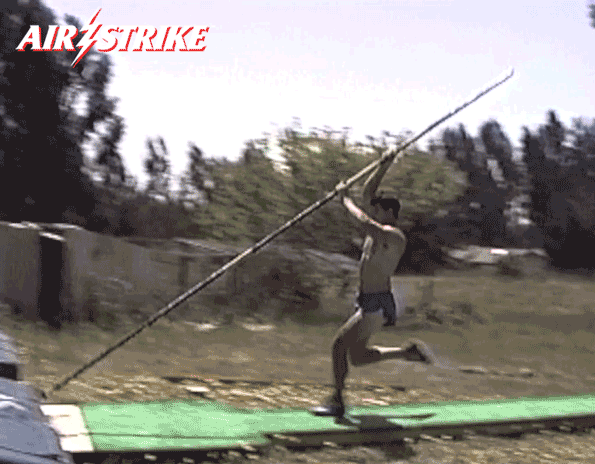
You can confirm for yourself the ongoing never-ending ignorance embedded within lethal "traditional" pole vault by observing the world class athlete in the next videos below. This is Sam Kendricks, 2016 Summer Olympics, Rio de Janeiro, Brazil, pole vault medalist, demonstrating his RIGID vaulting tactics. You can plainly see that Sam is STILL using the same old 1950s "traditional" pole vault methods applied by Bob Richards and Don Bragg. It is amazing that Sam Kendricks still does NOT KNOW HOW to execute proper pole vault inversion methods that I, Sergei Bubka and my son, clearly realized decades ago. In the animated image of Chris Toledo above, you can observe Air Strike methods that completely quash the primitive "traditional" pole vault concepts used by Sam Kendricks shown below.
Please, watch the first video at normal speed between 23 seconds and 25 seconds (video should automatically start on that time its first "PLAY"). After that, on the second video, click the center button to begin play, then, enter "full screen" mode (symbol at lower right). Now, you can carefully observe the facts for yourself by starting and stopping with the pause/play functions. In negligent "TRADITIONAL" pole vault, as has now been documented thousands of times over the decades, this ARROGANT DISREGARD FOR PROPER TECHNIQUE HAS REPEATEDLY PROVEN LETHAL. Deadly "traditional" flawed philosophies need to be taken seriously if we ALL truly care to prevent senseless injuries being inflicted upon intentionally misinformed vulnerable athletes!
Source: U.S. Army Website Videos - https://www.youtube.com/watch?v=SC7f9quDmPQ - Creative Commons
In Sergei Bubka's RIGID pole demonstration below, you will see for yourself how Sergei Bubka places his left elbow between the pole and his torso to properly invert just as Chris Toledo had also performed the same "elbow-in" procedure decades ago.
You can see how Bubka places his left elbow inside, between the pole and his body, at 0:10, 0:20, 0:57 & 1:05 of the video. This move is crucial to proper inversion during Air Strike "rigid" pole vault TRAINING.
Conscientiously study and execute AIR STRIKE fundamental training methods to discover the ease with which pole vaulting can actually be safely, confidently and consistently performed. ALL basic AIR STRIKE fundamental training procedures can be perfected WITHOUT USING FLEXIBLE "COMPETITION" poles. Proper application of FLEXIBLE "COMPETITION" POLES WILL NEVER be attained WITHOUT MASTERING AIR STRIKE fundamental training procedures FIRST!
-
AIR STRIKE RIGID POLE VAULT instructions provide the rock-solid foundation upon which outstanding AIR STRIKE FLEXIBLE POLE VAULT results are successfully constructed. RIGID pole vaulting is MUCH SAFER and VASTLY SIMPLER to perform PRECISELY as a beginner learning to apply PERMANENT pole vault fundamentals correctly. Basic vaulting fundamentals must be properly performed on RIGID POLES and UNIFORM SHAFT FLEXIBLE TRAINING POLES prior to any athlete ever attempting to vault with ANY FLEXIBLE "COMPETITION" POLE.
-
It is extremely simpler to first learn how to be in the air at "STRIKE" applying a rigid pole because of the stability produced the moment the pole tip strikes the back wall of the plant box. All of the movements that are critical to properly initiating any type of pole vault can be perfected on a rigid pole. These basic fundamentals include the opportunity to safely perfect VERTICAL EXTENSION along with the RUN, JUMP, FLOAT, STRIKE and INVERSION before ever attempting to pole vault applying deadly FLEXIBLE "COMPETITION" poles.
THESE PROCEDURES MUST BE CONSISTENTLY PERFORMED AS NEAR TO PERFECT AS POSSIBLE!

THE FOLLOWING PERSPECTIVES CLARIFY WHY WE SAID IN 1992 THAT, "DOZENS OF BASKETBALL PLAYERS CAN BREAK THE CURRENT WORLD RECORD WITHIN MONTHS, USING THE AIR STRIKE POLE VAULT SYSTEM!"
AIR STRIKE "FLEXIBLE" POLE POSSIBILITIES!
In 1992, at 6' 6'' tall, Michael "AIR JORDAN" could JUMP to reach at least twelve feet above ground-level. In his prime, "AIR JORDAN" had a higher vertical leap and could jump to touch nearly as high as the much taller Shaquille O'Neal who was officially recorded reaching 12' 5'' vertically. At the time this is being written, Dwight Howard, at 6' 11'' tall and weighing 270 pounds (plus or minus a few pounds), has recorded a vertical JUMP in which he touched 12' 6'' above ground-level. Thus, it is logical to conclude that there are today dozens of basketball players possessing the physical ability to easily break both RIGID and FLEXIBLE pole vault world records applying the revolutionary AIR STRIKE POLE VAULT SYSTEM in which real JUMPING skills can actually be fully utilized. AIR STRIKE "HORIZONTAL FLEXED POLE ROTATION" avails extraordinary "FLEXIBLE" pole vaulting HEIGHT POTENTIAL that truly great athletes can consistently achieve.
For example, let's use REAL laws of physics relevant to 6' 8'' LeBron James. It can be argued that LeBron James qualifies as a "great" athlete who is easily capable of leaping to reach 11' 0'' above ground-level, even while wearing cowboy boots. Now, let's include Pythagoras in the mix and see how 2500 year-old Pythagorean mathematical formulas validate the potential of combining the jumping ability of LeBron James and the revolutionary AIR STRIKE POLE VAULT SYSTEM that incorporates JUMPING SKILLS.
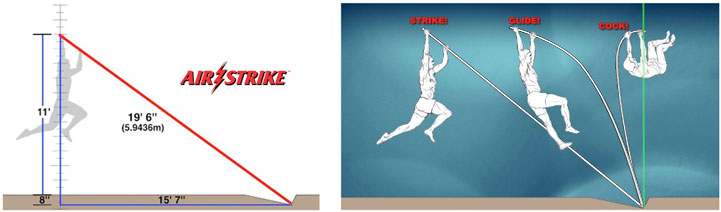
In the chart below, the @60% column beneath the heading Bent EOE Distance From Ground to Top Tip Less 8" (.203M) Box Depth shows in the POLE LENGTH column, that a flexible vaulting pole 19' 6" (5.944M) long needs only to have its top tip located approximately 11 FEET (3.353M) above ground-level at "STRIKE" to create a 15' 7" (4.750M) required forward distance to reach proper END-OVER-END vertically "cocked" position, according to manufacturer specifications, during the HORIZONTAL FLEXED POLE ROTATION process. The GLIDE PATH follows a HORIZONTAL LINE because the vaulter's bodyweight matches exactly that of the pole rating. The "rotating" pole's building resistance, as the vaulter glides forward, holds the vaulter in the air while the suspended vaulter's uninterrupted forward momentum properly "loads" and "cocks" the flexing vaulting pole according to its built-in "linear elastic behavior" principles.
At this point, the vaulter's perfect "INVERSION" position launches the athlete VERTICALLY (rather than diagonally), which enables extraordinary APEX potential that ultimately enhances the advantages of AIR STRIKE methods.
One very IMPORTANT thing to ALWAYS REMEMBER is this: HIGH JUMPING BASKETBALL PLAYERS DO NOT RUN FULL SPEED WHEN "DUNKING" OR EXECUTING EXTRAORDINARY VERTICAL LEAPS!
AIR STRIKE HORIZONTAL FLEXED POLE ROTATION and LEVERAGE principles produce innovative methods in which LONGER vaulting poles can be utilized with consistent near-perfect VERTICAL TRAJECTORY. As our basketball player examples display, it is utter PHYSICAL REALITY that dozens of today's basketball players are easily capable of breaking current pole vault world records. It is a simple physical fact that vast numbers of these athletes can apply the AIR STRIKE POLE VAULT SYSTEM to correctly implement LONGER flexible poles that are NOT POSSIBLE to employ using physically limiting "TRADITIONAL" lethal "SPEED+PUSH" foolishness.

"AIR STRIKE" training procedures BEGIN with RIGID pole vault methods critical to permanent proper vaulting habits.

NOTE: Although, we do NOT BEGIN the training process with "FULL" vaults, "AIR STRIKE" drills provide simple methods of accurately simulating "FULL" vault processes from the beginning. "AIR STRIKE" exercises also include very simple methods for becoming accustomed to "HORIZONTAL FLEXED POLE ROTATION" principles along with elementary flexible "TRAINING" pole progressive "grip-height" applications. The original "AIR STRIKE" FLEXIBLE "TRAINING" pole procedures advance vaulting skills incrementally while the athlete gradually develops the ability to correctly "LOAD" and "COCK" FLEXIBLE vaulting poles low and close to the landing surface. As demonstrated here, our "Horizontal Flexed Pole Rotation" simulator simplifies learning a very complex life-saving movement in which the flexed pole is fully "cocked," end-over-end, at the vertical threshold. This places the vaulter in perfect position to safely invert and execute an ascent that occurs entirely above the landing mats.

During a "FULL" AIR STRIKE "FLEXIBLE" pole vault, it is at the exact INSTANT of "STRIKE" when the "HORIZONTAL FLEXED POLE ROTATION" process begins. This is the means of "LOADING" the FLEXING pole to properly "COCK" the bent pole according to manufacturer specifications, which is a unique and extraordinary AIR STRIKE pole vault innovation. The "HORIZONTAL FLEXED POLE ROTATION" simulator (shown below) avails the opportunity for students to safely learn this critical movement while efficiently utilizing everyone's valuable time and the athletes' energy. This apparatus allows the movement to be practiced perfectly applying many more repetitions.